
USA New Wall - The Better Wall
The second configuration of the USA New Wall we are going to look at is the Better wall. The Better wall is all about breaking the thermal bridge of the wall framing. We start with the Good wall, and add insulation layers inside or outside that keep the studs from sending your heat directly through the wall. The framing of the wall is still kept simple so you already know how to build this.
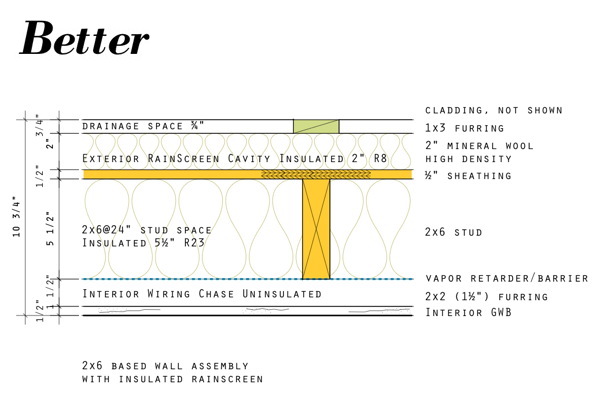
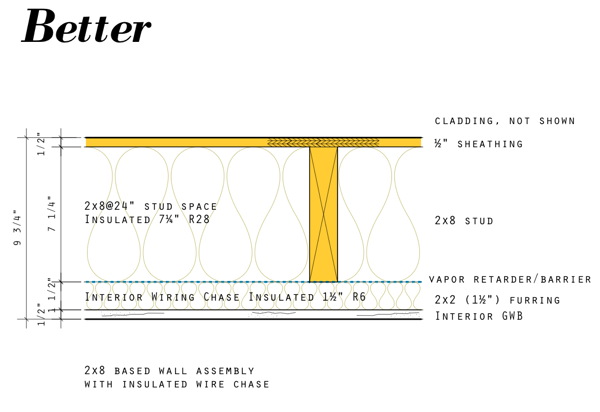
The Better wall comes in two flavors, so lets start with the interior insulated wire chase version. We add an interior wire chase to a basic wall which provides a space to run wires and mount electrical boxes that will not puncture the vapor retarder/barrier. This is a huge asset for maintaining the air-tight envelope of the house. Wires are easy to run, and can be snugged between the furring and vapor retarder. Plumbing supply lines can also live in this space.

This wiring chase is also insulated with an R6 mineral wool batt which does two things - it adds additional insulation, and creates a thermal break from the wall studs. This thermal break reduces the bridging loss and increases the wall system average R value over adding a similar thickness of insulation to the primary cavity. For instance, this 2x6 based Better wall will have a higher total R value than the 2x8 based Good wall even though its total insulation thickness is less (7" vs 7.25"). Furthermore is will be easier to build a tight wall system with the Better wall because there are no penetrations in the vapor retarder for electrical devices.
Now lets look at the exterior insulated version of the Better wall.
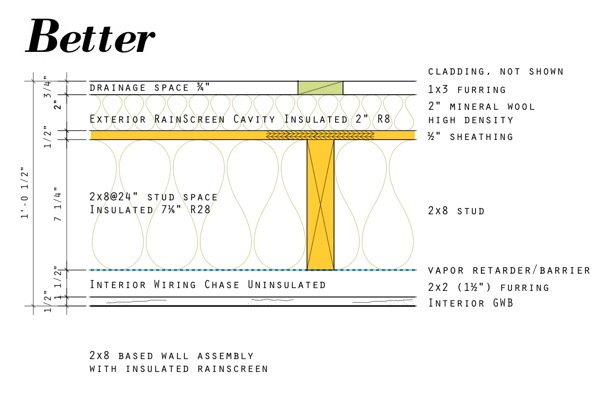
Here we add a 2" thick R8 insulation layer on the outside of the sheathing in conjunction with a furred stand-off for a rain-screen cladding system. Again the exterior insulation creates a thermal break for the stud wall framing, and in this case the exceptional properties of mineral wool allow it to be placed in the rain-screen cavity this way without any additional cover. Housewrap or building paper is located behind these exterior batts. These are very dense and capable of having siding or even stucco applied over them.
Now there has been a very strong trend for applying foam layers to the exterior of a wall to create thermal break and add more insulation value. So why mess with mineral wool when you could just do foam? The answer is permeability. The foam layers create a strong vapor retarder layer at the exterior of your wall, so if you hope to put a vapor retarder at the interior side of your wall you will be creating a double barrier wall which is a no-no. A wall configured like this will not allow the interior of the wall to dry if any moisture gets in, and mold is the almost certain result. So the solution for foam exterior walls was to omit the interior vapor retarder and allow the wall to dry to the inside. In order to do this you need a pretty precise calculation of where your dew point will fall, and you must get it inside the foam layers to prevent moisture from forming in your wall during the winter. Any builder you know ready to calculate the dew point location? Some exceptional ones maybe, but lets not kid ourselves. This is a risky configuration that begs expert design. Its fine for custom design, but not as a blind standard. Even a well designed wall can experience out of range temperatures that can result in condensation in the cavity. Hopefully it drys quickly, hopefully it does not compromise the insulation, hopefully it does not trigger mold growth. This is a bad wall design. I strongly recommend against such configurations in heating climates.
Back to our mineral wool exterior insulation - it has a very high permeability value and allows the wall's vapor profile to behave normally. This is the best insulation for exterior layers, and its R value approaches the more expensive foams.
We also show the exterior insulated wall with an interior wiring chase. This is because this is a fantastic way to isolate the main wall cavity from wires and interruptions in the insulation, and it also prevents penetrations through the vapor retarder/barrier layer.
Both of these wall flavors are also doable with 2x8 studs for higher insulation values:
All of the cautions from the Good wall post still apply here. If you are using summer cooling then you should stick with the adaptable vapor retarder. If you are in zone 5 or the northern portions of zone 4 then you should use the vapor retarder. If you are in Zone 6 or 7 and will not have cooling, then go for the vapor barrier, and favor building paper over house wrap to keep your wall breathing as much as possible. Go back to the Good wall post for a more detailed discussion of these considerations.
What are the caveats with these walls. First there is more material, and more labor in these walls. These will be more expensive, and there is simply no way around that. But the process and materials are all familiar, and any builder should be able to estimate their time and cost to quote these. Second caveat is these walls will mess with your sequencing. If you are a small builder who does their own carpentry and insulates their own jobs, you will love these walls. If you are more of a construction manager with list of favorite subs, you'll find the building sequence will be extended, and subs will have to make double visits to finish the wall. Your inspections may get spread out because framing must be inspected before its insulated, yet wiring can not proceed till the main cavity insulation is done. Think it through. Consider picking up the second insulation round with your own crew. Press your sub for a better deal for the return. You can make it work.
These walls in fact point the way to off-site fabrication. The question of sequence is moot when built in the factory because there are no additional trips to install the multiple layers. Get your feet wet with site building these walls, then consider framing them off-site on your next project. We can help you get up to speed on this.
Well, these two wall configurations are the foundation of the USA New Wall. You can't get much better than this, but we'll see what's Best next.


These wall systems looks pretty sweet...
ReplyDelete1 thought popped into my mind though... would the electric inspector be o-k with the wiring in the 2x2 chase....
I though I remember reading that residential building code in the US requires wires to be at least 1.25" from the front edge of those studs (2x2 chase in this case)...
I guess you could just sneak 'em right up against the vapor barrier and that would keep them just far enough away...
Any thoughts on this?
(also just realized that this would force electrical boxes to be really shallow... and possibly hard to install... but maybe there is a solution for all this).
I've responded to these same questions elsewhere when they were posted to the blog, but its a good question and well worth repeating.
ReplyDeleteWood cover: Yes, the wiring passes behind the 2x2 furring giving 1.5" of cover. This is greater wood cover than a wire in a 3/4" hole gets when passing through the center of a 2x4. So, no, I don't think there is any issue here. The Swedish walls these are based on pass the wires behind the furring, against the vapor sheet. Its simple and easy to do, and much less work than boring holes in the studs. It also makes the insulation of the wiring chase easy because the wire is never at the center of the batt, rather always at the back. So there is less trimming of insulation -it just covers the wires.
Electrical Boxes: For switches and outlets you would simply use a 4x4 box that is 1.5" deep, with a reducer that allows for a standard device and cover plate to be mounted. A 4x4x1.5 box has more cubic inches inside and is rated for more wires than a typical switch or outlet box so there is more room, not less. Installation is easy - the boxes simply mount to the face of the studs. Or to the side of the furring. You actually have more places to mount the box, and so its easier rather than harder to locate your boxes.