
Letters from Sweden - A closer look at a closed wall panel assembly line
We've described the Swedish method of building off site in several past blog posts, but today we will take a closer look at the assembly line to get a better idea of how you build walls this way.
The first thing I have to explain is that a fully automated line like this is not needed to build houses the way they do in Sweden. In fact most of the small factories do not have these complex machines, and are using a simpler process, more manual, less automated. But what they both have in common is a reduction in wasted effort, a lean process of building. In the next few days we'll also look more closely at how they build without all this machinery.
But first this machinery. The Swedes build wood houses in a particular way, and so a Swedish company named Randek Bautech builds machines that automate the way the Swedes build houses. They can't expect a German company or a Japanese company to do this, so they invent their own. Makes perfect sense. What exactly do I mean by that though? Well for instance the Swedes use solid wood siding when they use siding on their houses - not vinyl as common in the US. So they create a machine that can nail their solid wood siding. Obviously this would not have much use for a large US builder who primarily uses vinyl siding. Ok, got it?
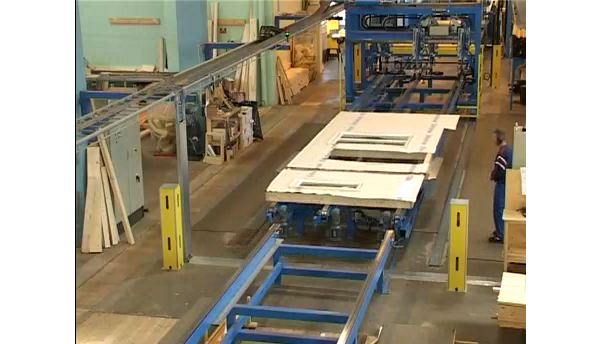
Randek Bautech provides a great video of this line in action which I will post here. But first lets look at the line:
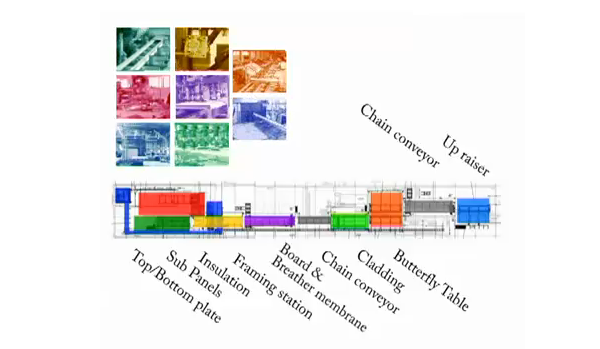
It goes in this sequence:
- top and bottom plates of the stud wall cut to length
- sub panels means the studs that form up window and door openings
- insulation cut to fit the stud spaces
- framing station is where the wall studs and plates come together
- board and breather is exterior sheathing board, and the vapor permeable air barrier
- cladding is where the solid wood siding is applied
- butterfly is their name for the flip table that turns the wall panel over
- indications of chain conveyors are areas where the wall panels are transferred between stations and some manual portions of the work are completed.
- finally the up raiser is the machine that stands the panel on end so it can be conveyed to be wrapped and loaded on the truck.
Lets look at some stills of each step now.

This is the sill plate being formed. It is in two parts bridged by a thin panel - this is because it sits on top of a center plate that is pre-attached to floor, so the wall panel aligns itself when placed. This makes sense because your precision happens when you nail the center plate to the floor - easy, not when a 2000kg panel is dangling from a crane - not easy.
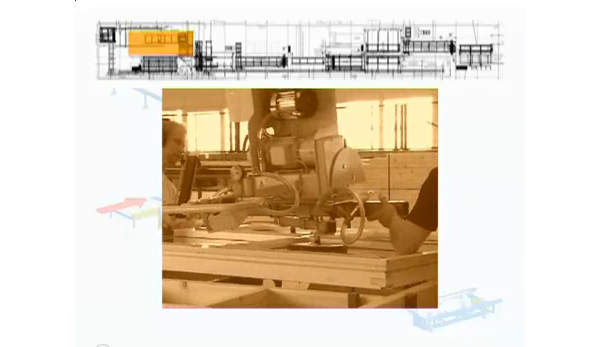
Here is the sub-panel station, where we see a window being installed into the framed opening. Yes, that's right, the window is installed before the wall is even framed. This whole assembly will then find its place in the line of studs making up the given wall.
This machine unrolls the insulation batts, and cuts them to fit the spaces coming in the wall panel. One of the worker will tamp them in to be sure they are positioned correctly.
The framing station where the plates and wall studs are joined - now you have a panel.
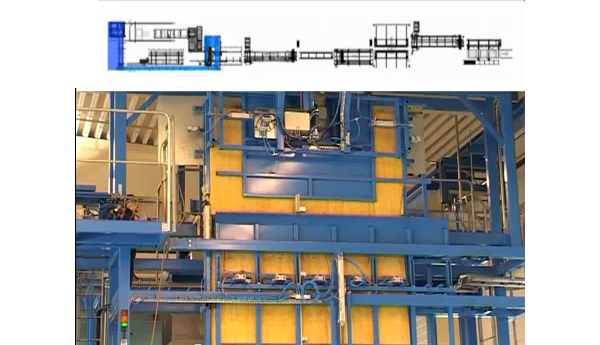
This is where the wall sheathing is cut and applied, and the wall wrap put on the exterior. From here it enters one of the transfer sections where battens are applied for the upcoming siding.
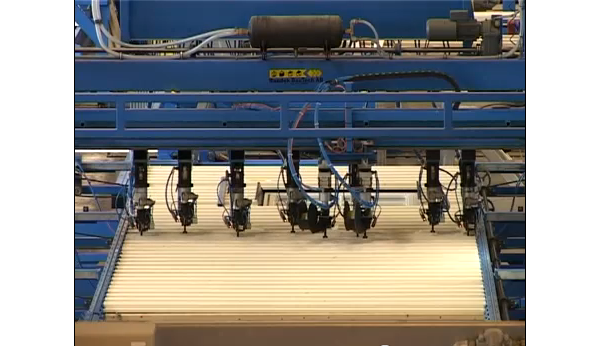
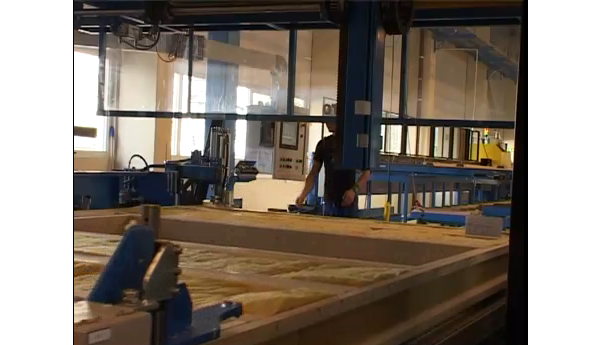
Here the siding panels are automatically nailed to the wall panel over the battens. Each of those nailing lines are following a batten line, with additional nail lines positioned over and under the window to fasten the ends of these short boards.
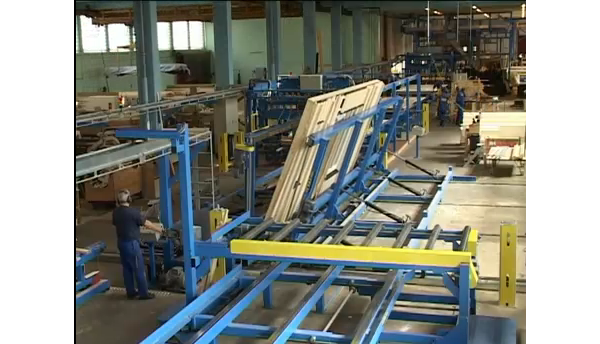
The flip table makes short work of turning over a large wall panel so you can work on the other side. Now the interior air barrier can be fastened. In the video the line stops there, but the transfer area here can also be used to fix interior battens, electrical boxes and wiring conduits, and finally the interior gypsum board.
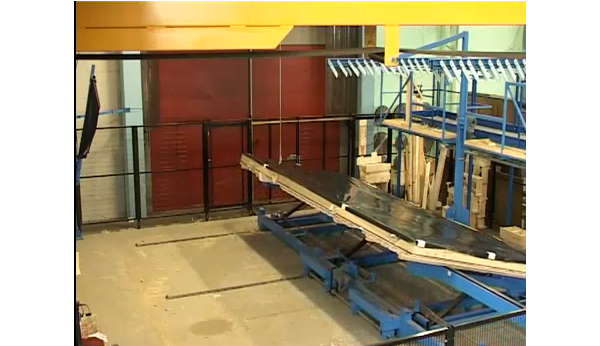
And finally the wall panel is stood on end, passed by cart to the next worker who will wrap it and then stow it in a rack, and eventually loaded on the truck for delivery.
And like this an entire house can be fabbed in a day, easily. As we've seen in other videos those panels then delivered to a site with a waiting slab will also be assembled in a day. I assure you the bulk of wasted time has been wrung out of this process. Enjoy the full video below:


Two items: I hate batts. I'd prefer to see sprayed urethane or something similar, and with the level of automation that they already have implemented, it'd be a no-brainer to have the hardware installed into the current process line, even if a trimmer station is added for the overage. Second item is panel depth; it would appear to be about the same as our nominal 6", or in metric dimensions, about 150mm.? That's good, as I know my house is framed only with 2x4 studs, and I'd appreciate having the extra insulation in my rather extreme weathering environment.
ReplyDeleteAs always, thanks and good work on getting these kinds of vids and articles posted.
Yes, architects all seem to hate batts here, because they are always installed so poorly, and leave gaps, and holes where cut around wires and pipes and junction boxes. Its not the batts fault - its the wall SYSTEM's fault. Some clarifications:
ReplyDeleteOk, first - batts there are not fiberglass. Its mineral wool, higher density than our batts, more insulation value.
Second, studs are deeper than 6" full in most cases, and sometimes are supplemented with another layer of insulation outside or inside.
Third, the wiring is all run in the furring space, so there are no penetrations of the vapor barrier, and there are no voids in the batts. They have as full and dense an installation as we try to get here with blown in or spray foam, but guess what. Its cheaper to use batts, and so everybody can afford a highly insulated house.
So there is nothing wrong with batts, what is wrong is the way we build with batts in the US.
Oops - I think the most typical studs they use are 195x45mm
ReplyDeletethats about 7.5" deep - closer to our 2x8s. That may not be what we see in this particular video. With their denser insulation you can get what I expect is close to an R30 batt in that wall. Thermal bridging will reduce that and is sometimes mediated by an external insulation layer, but its a pretty high performance wall they build.
They look about 200mm wide to me definitely more than 6 inches.
ReplyDeleteSimply Awesome!
ReplyDeleteIt is. After blathering about it for so long its nice to see it in an easy to understand presentation.
ReplyDeleteDoes this mean that they have an inventory of walls? You pick a particular design and through standardization they can assemble a building practically right there because of prebuilt assembly?
ReplyDeleteLego houses? Cool!
No, no inventory of built walls - that product sitting idle would be inefficient.
ReplyDeleteInstead, its all built to order as needed for customers.